
UPDATE: thank you all for your votes!! My card came in at #5! I feel honoured to be in the Top Ten with such talented designers! Watch for the Top Ten blog hop at the end of the month!
I am participating in Kylie's November International Blog Highlights, and would like to ask for your vote again, please! If you like my card, please click on the link below, and vote for me by clicking on the top right corner of the thumbnail of my card (which is card #33), until you see the heart turn red.
Please click here to vote for my card.
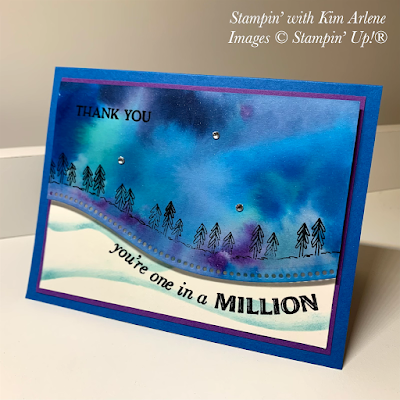
Stampin' Up! has an AMAZING new group of products that will be available to customers starting November 3! You won't want to miss this bundle! I used three of the four new products for this card--the Curvy Christmas and Quite Curvy stamp sets, and the Curvy Dies.
I started with a 5" x 3-1/4" piece of Shimmery White cardstock, and then used the curved eyelet die to cut the bottom edge. The watercolour layer is created with several colours of ink refill drops (Balmy Blue, Highland Heather, Bermuda Bay, Pacific Point, and Night of Navy) added to wet Shimmery White cardstock. Check out one of my recent blog posts (October 5, September 28, 27, or 14) for more details about this method. I used a heat tool to dry this thoroughly, then stamped the trees (from Curvy Christmas) and the "Thank You" (from Blossoms in Bloom) with Memento ink.
The layer below is a 5 x 3-1/2" piece of Whisper White cardstock. I masked it with two Post-It notes--both were cut into curves to resemble a hillside. I sponged with Balmy Blue just above the lower curved edge in small circles, then added the second Post-It note and repeated the process. The sentiment (from Quite Curvy) was stamped in Memento ink. Next, I swiped my Versamark ink pad all over the Whisper White piece, embossed with clear embossing powder, and set it with a heat tool.
The close-up photo shows the details I was trying to achieve--a shiny snowy/icy effect. I added foam strips to the back of the watercolour piece, and then adhered it over top of the snowy hill layer. This was then matted on a 5-1/8" x 3-7/8" Gorgeous Grape layer, and then attached to the Pacific Point card base (5-1/2" x 8-1/2", scored at 4-1/4). The watercolour layer was adhered with Foam Adhesive Strips, to give it some dimension. I added three rhinestones to the sky.
I made a second version of this card, using the same ink refill colours--this one is a bit lighter, because I used more water on the Shimmery White cardstock. The "Thanks" sentiment is from Sailing Home.
For the lower layer, I used our Balmy Blue Glimmer Paper. The bottom sentiment was stamped on Vellum with Memento ink. To attach it to the Glimmer Paper, I used Seal+ and touched the Vellum to the Seal+ so that only one of the tiny rectangles of tape stuck to the Vellum. I did this four times, and was very pleasantly surprised--it adhered very well, and you can't see the adhesive through the Vellum, but you can see the Glimmer Paper through it! Yay!!
Here's one more version. I used mostly the same ink refill colours, but I added Granny Apple Green. The Pacific Point mat was embossed with the Tasteful Textures embossing folder, and this was layered on a Pear Pizzazz layer. The sentiment is another from the Quite Curvy stamp set.
Which card do you like best? I'd love it if you would leave a comment below, before you vote. Please remember to click on the heart in the top right corner until it turns red--that way you know that your vote is registered. Thanks so much for stopping by--and for voting!!! If you like my card, please vote for it here:
Product List


All three are great but my favourite is the last one in blue and green! Thanks Kim for being part of my International Highlights this month! All the best with the voting.
ReplyDeleteThanks for your kind comment, Kylie! I really enjoy participating in your International Highlights!
DeleteA clever use of the refills, and it produced beautiful cards.
ReplyDeleteThanks, Rachael! It's a quick technique, too!
DeleteVery pretty cards! My favorite is the third one. I love blue! 😀
ReplyDeleteThank you, Jennifer! I think the third is my favourite, too--I like blue, too!! Can you tell? 😉
DeleteGood jjob
ReplyDeleteThanks very much, Tabitha!
Delete