Monday, December 28, 2020

Dandy Garden Laser-Cut Thank You Card

Thank you for visiting my blog! I am so excited to be participating again in Kylie Bertucci's Top Ten Winners Hop! I am honoured to once again be grouped in with some very talented designers from all over the world. Thanks to your votes, my card came in #4!!  In case you haven't seen it, I have posted it at the end of this blog entry.

For the Winners Hop this month, I wanted to showcase Stampin' Up!'s amazing Dandy Laser-Cut Paper, which is available (with the rest of the Dandy Garden Suite) starting January 5th. This product comes with an assortment of card fronts and accents, and coordinates with our Dandy Garden Suite. I chose to use the dandelion silhouette laser-cut card front for this really cool gift card holder. 


I think these silhouettes are most effective when there is a bright Designer Series Paper (DSP) behind the laser-cut. I chose to use one of the beautiful, bright DSPs from Whale of a Time. I cut a 4" x 5-1/4" piece, and then used my trimmer to cut out a window that was slightly smaller than the 3-1/4" x 4-3/4" laser-cut paper. I glued the resulting frame to the centre of a 4-1/4" x 5-1/2" piece of Whisper White Thick cardstock.


The card base is a 9-3/4" x  4-3/4" piece of Pacific Point, scored along the long side at 3-1/4" and 6-1/2", and then folded into a Z-fold. The dandelion laser-cut was adhered to the smaller piece (the cut-out window) of DSP, and that was glued to the front of the card. The back part of the Z-fold is centred over the frame of DSP and glued. I used the largest Stitched So Sweetly die (if you don't have this set, it's a MUST--I use it all the time with my cards!) to cut Whisper White cardstock for a message. This is glued onto the third panel of the Z-fold. A piece of the DSP was cut with the fourth largest rectangle to make a pocket for a gift card. The bottom and sides (not the top!) of the rectangle were glued at the very edge, and attached to the second panel. 


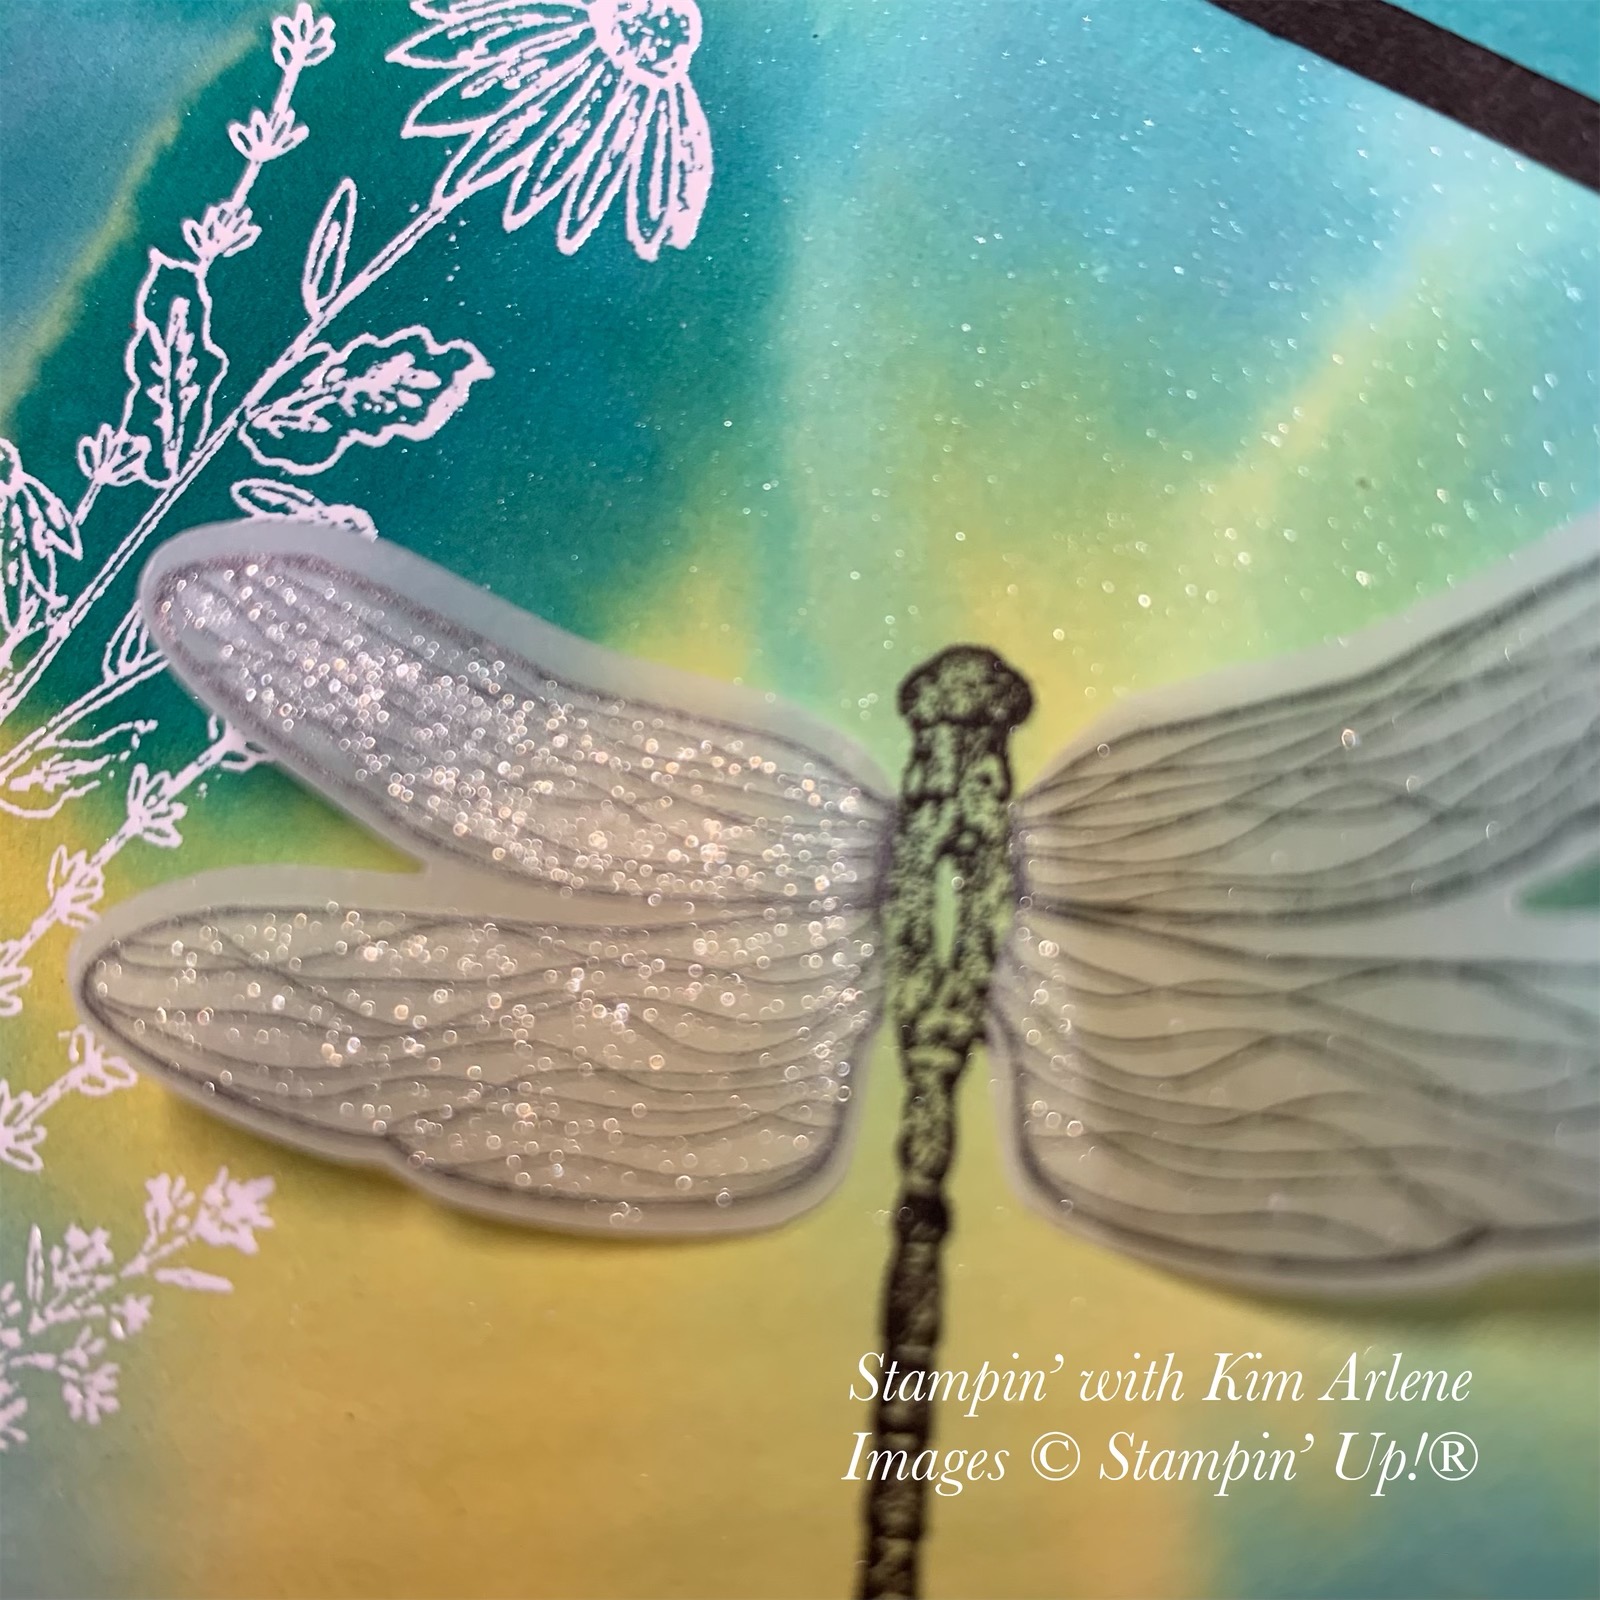
I punched a dragonfly out from one of the sheets of Dandy Garden DSP. The colour didn't coordinate very well with the Pacific Point, so I coloured over the Misty Moonlight parts of the dragonfly with a Pacific Point watercolour pencil, and then used a Blender Pen to blend the colours (this worked beautifully!). I glued only the body of the dragonfly to the card, painted the wings with Wink of Stella, and lifted the wings up a bit from the card. The sentiment (from Itty Bitty Greetings) was cut with another Stitched So Sweetly die. I finished the card with three Rhinestone Basic Jewels.


Here is another example using a different laser-cut paper card fronts.


If you don't want this as a gift card, then you can glue all four sides of the scalloped rectangle of DSP. You may want to rotate it so that it is in "portrait" orientation.


Here is the card that placed fourth in Kylie Bertucci's International Highlights blog contest. It is also from the Dandy Garden Suite--and used the Dandy Garden stamp set. 


Thank you again for visiting my blog! I'd love it, if you have a moment, if you would leave a comment. Then be sure to visit the other Top Ten Winners! 

~ Kim ❤️


Product List

Monday, December 14, 2020

Snowflake Splendor Card


Welcome to our West Coast Creators December blog hop! Where does the time go? Since it's not too long until Christmas, I thought I'd do a last blog post with Christmas cards. I run a Virtual Technique Club--it's fun to get together each month and do some cards while socializing online. It's definitely my "happy place" these days! My sister issues us a challenge to complete some cards, and we share them at our next meeting. Our last challenge was a 6" x 6" One Sheet Wonder from Megan Daves, a demonstrator in Texas. The nice thing about these is that there are enough pieces of Designer Series Paper (DSP) to create multiple cards--in this case four.


I used my favourite Christmas paper--Snowflake Spendor DSP. For the first card, I used a 1-5/8" x 5-1/4" piece of DSP, and adhered it to a 4" x 5-1/4" piece of Pacific Point cardstock, which had been embossed with the Winter Snow embossing folder. I wrapped a piece of Snowflake Splendor ribbon over the seam, then around to the back and taped it. This was glued to an 8-1/2" x 5-1/2" (scored at 4-1/4") Pacific Point card base. The snowflakes were diecut with the So Many Snowflakes Dies from Balmy Blue Glimmer Paper (with an adhesive sheet on the back), and adhered to the embossed cardstock. The sentiment, from Snowflake Wishes, was stamped with Pacific Point onto a Stitched Shape Oval, and attached to the card front with Dimensionals. 


The DSP for the second card is a 4" square, which is cut diagonally. I cut a border from Pacific Point cardstock, using one of the Ornate Borders dies, and glued it below the DSP. Then I adhered it to an embossed Balmy Blue cardstock layer. I added a piece of Snowflake Splendor ribbon, again attaching it to the back of the cardstock. The sentiment was popped up with Dimensionals, and then three Blue Adhesive-Backed Gems were added.


The third card used a 4" x 2" piece of DSP, another Pacific Point border, Snowflake Splendor Ribbon, and a Balmy Blue embossed layer. I used our new Blending Brushes to add some Pacific Point ink to the snowflakes. I really like the effect. The sentiment tag was cut with one of the Tasteful Labels Dies, and three Adhesive-Backed Gems finish off the card.


Here is the card made with the last remaining piece of DSP. The sentiment tag is from a soon-to-be-released die set (Potted Succulents Dies--I think this will become a new favourite!) in our January to June 2021 Mini Catalogue, which goes live January 5.

One Sheet Wonders are a great way to make a group of cards quickly! I hope you like these!

Thanks for visiting my blog! Before you go, I'd love it if you would leave a comment below. Then be sure to check out the amazing talents of my fellow West Coast Creators demonstrators!  


You are invited to the Inlinkz link party!

Click here to enter

Monday, December 7, 2020

Dandy Garden Thank You Card

It is time for Kylie Bertucci's December International Highlights competition. I am participating, and would like to ask for your vote again, please! If you like my card, please click on the link below, and vote for me by clicking on the top right corner of the thumbnail of my card (which is card #9), until you see the heart turn red


So, my watercolour craze continues... When I saw our soon-to-be-released Dragonfly Garden stamp set, I knew I wanted to do a watercolour wash background with it. At our last team meeting, I did a presentation on watercolour techniques, and the background of this card is one of the techniques that I demonstrated. I used Shimmery White cardstock (3-3/4" x 5"), spritzed the back with water a few times (this minimizes curling) and the front generously. Then I dabbed ink refill drops (Daffodil Delight, Balmy Blue, and Bermuda Bay--starting with the lightest colour), adding to the wet paper with a Water Painter, and let the ink blend on its own. After it was thoroughly dry, I embossed the flowers with white embossing powder, and set it with a heat tool. The sentiment is stamped with Memento ink.


For the dragonfly, I used a black Stampin' Write Marker to add ink on the stamp to the body of the dragonfly only, and stamped directly onto the watercolour. I stamped the dragonfly (mainly the wings) on vellum with Stazon ink, punched it out with the Dragonflies Punch, cut the wings off the body, and then used two tiny rectangles of Seal+ on the (body) edge of each wing to attach it to the body on the card front. I applied Wink of Stella to the wings, and lifted and curled the wings up a bit. The watercolour layer was adhered to a 4" x 5-1/4" piece of Basic Black cardstock with Seal+.


I wrapped a piece of Pool Party Sheer Ribbon around the card and tied it into a bow. The card front was glued to a Bermuda Bay card base (8-1/2" x 5-1/2", scored at 4-1/4") with Seal. One of the sweet Ladybug Trinkets was added with a glue dot. 

If you like my card, please vote for me by clicking on the following link--then click the top right corner of the thumbnail of my card (#9) until the heart turns red:

Please click here to vote for my card.

Thank you very much for your support!!


Year-End Closeout and SALE!!


We are having a Year End Closeout Sale!! Our Holiday Mini Catalogue ends soon, and lots of items are on sale starting tonight (December 7) at 11:00 pm (Pacific Time)--some are up to 50% off!!! Products will sell out QUICKLY, so if you have your eye on something, don't delay! If you live in Canada, order in my online store and use my current Host Code RSD74PRV--your order will ship directly to you, and you will receive a gift in the mail from me! The list of retiring and sale items is below.

Click here to go to my online store.

(Remember that the sale does not start until December 7 at 11:00 pm.)


Click here to see PHOTOS of the products on sale--items are going quickly!!!


Thanks for stopping by! 


Monday, November 23, 2020

Kylie’s Winners Hop - Quite Curvy and Dandy Garden


Thank you so much for voting for my card in Kylie Bertucci's November International Blog Highlights--my card came in fifth!! I now have the honour of participating in the Top Ten Winners Hop, along with talented designers from all around the world!


I made two similar cards inspired by one I recently designed for our West Coast Creators Blog Hop. You'll have to let me know which one you prefer, if you have a moment to comment below. They both use our new Quite Curvy Dies, as well as some Dandy Garden Designer Series Paper (DSP), which will be available in our new January to June mini catalogue. I participated in Stampin' Up!'s OnStage at Home virtual convention, where demonstrators got a sneak peek of the upcoming catalogue, and we got to preorder several items from the Dandy Garden Suite. You will love all of the products in the new catalogue!

The dandelion DSP is one of my favourites from the package! I used the Quite Curvy Die to cut a 5-1/4" x 2-1/4" piece of DSP, and then cut a matching curve of silver foil (5-1/4" x 1-1/2"), making sure it was wide enough to show through the holes of the dandelion paper. I glued these together with Seal, and trimmed any extra from the sides. A 5-1/4" x 4" piece of Misty Moonlight cardstock was embossed with our Tasteful Textile 3D embossing folder, and the DSP/silver foil was adhered to it with Seal. I wrapped a 5" length of Metallic Mesh Ribbon around the left side of the Misty Moonlight layer, taped it to the back, and then glued the card front to a Night of Navy card base.


The dragonfly is from another piece of the DSP, and was punched out with the Dragonflies Punch (another part of the new suite--it cuts this size of dragonfly (which is also in the coordinating stamp set), as well as a smaller one (which is also in the stamp set and on the DSP). I glued the body of the dragonfly to the card front with liquid glue, and I popped up the wings with Mini Dimensionals. 


The sentiment (from Love of Leaves) was stamped in Misty Moonlight, cut out with the smallest oval from the Stitched Shapes Dies, glued to a Misty Moonlight mat cut with the smallest of the scalloped Layering Ovals Dies, and then added to the card with Mini Dimensionals. Three Basic Rhinestone Jewels finish off the card.


The Dandy Garden dragonfly paper also has Calypso Coral (Blackberry Bliss, and Mossy Meadow) dragonflies, so I punched out one of those, and made another similar card. I added a narrow Calypso Coral mat to this one. The sentiment (from Beauty Abounds) was stamped in Misty Moonlight, cut out with the smallest circle from the Stitched Shapes Dies, and glued to a silver foil mat cut with the second smallest of the scalloped Layering Circles Dies. I added the tag to the card with Mini Dimensionals. 


Below is my recent West Coast Creators blog hop card--the one that inspired these two cards.  You'll note it's very similar, but for this card I heat embossed the stamped dragonfly image with black and silver on vellum cardstock and then punched it out with the Dragonflies Punch. See my October 14 blog entry for more details.


Thank you so much for visiting my blog!! I hope you'll leave a comment before you check out the amazing cards in the Top Ten Winners Hop. And I hope you'll visit again soon!


Saturday, November 14, 2020

Dandy Garden Suite/Curvy Dies Card


Welcome to the West Coast Creators Blog Hop! Last week, I was part of Stampin' Up!'s virtual OnStage at Home event. This is where demonstrators from around the world get a sneak peek of our new January - June Mini Catalogue (which goes live to customers in January). We saw presentations showcasing many of the new products. We also got to pre-order several of the items from a new suite--the Dandy Garden Suite--and make several cards with them. I decided to play some more with my new goodies, and I made this card using them.

The beautiful Dandy Garden Designer Series Paper (DSP) was cut with one of the Curvy Dies (this is another set you won't want to miss!). I cut some silver foil to match the curve of the DSP, and glued it just below the paper, so you could see the eyelet border, as well as the silver through the holes of the DSP layer. 


I adhered the silver/DSP layer to a piece of Misty Moonlight cardstock that was first embossed with the Tasteful Textile 3D embossing folder. Then I added a piece of our Metallic Mesh Ribbon (by wrapping it around and taping on the back), and glued this layer to a Night of Navy card base. The sentiment (from Dragonfly Garden) was stamped in Misty Moonlight on Whisper White cardstock, then die cut with the second smallest Stitched Shape circle. The dragonflies on the tag are "third-generation", stamped in Misty Moonlight. This is a term I learned at OnStage--generational stamping (also called "stamping off") means stamping on a scrap paper (this time twice) before stamping on the cardstock. The tag was added with Dimensionals.


For the dragonfly, I used a Stamparatus, and inked just the body with a Stampin' Write black marker and stamped it on vellum. I dried the black ink with a heat gun, and then stamped the whole dragonfly with Versamark, and added silver embossing powder. Before using the heat gun, I brushed away most of the silver embossing powder from the body. I cut the dragonfly with the Dragonflies Punch, added a few of the tiny rectangles of Seal+ (which doesn't show through the vellum!) behind the body, adhered it to the card front, and curled up the wings. I finished off the card with three Rhinestone Basic Jewels. 

I used three of the products from the Dandy Garden Suite in this card (Dragonfly Garden stamp set, Dragonflies Punch, and Dandy Garden DSP). There are more coordinating products--the Garden Wishes stamp set, Dandy Wishes Dies, Dandy Laser-Cut Paper, Dandy Garden Memories & More Card Pack, Dandy Garden Memories & More Cards & Envelopes, Mossy Meadow Braided Linen Trim, and the cutest Ladybug Trinkets!!! These products are available to demonstrators in December, and to customers in January.

Be sure to check out the rest of the blog! We have some very talented designers, and you won't want to miss their cards!

You are invited to the Inlinkz link party!

Click here to enter
Product List

Waves of Inspiration/Oceanfront Fun-Fold Thank You Card--Coast to Coast Creators April Blog Hop

I like this type of fun-fold card--it's unique! Hello and welcome to my blog! Our new Stampin' Up! Annual Catalogue launches May 1st...