Monday, March 28, 2022

Waves of Inspiration Thank You Card--Top Ten Winners Blog Hop


Hello, and thanks for visiting! And thank you so much for voting for my card--it placed third in Kylie Bertucci's March International Blog Highlights competition!! (If you haven't seen my "Top Ten" card, it is posted at the bottom of this blog entry.) Now I get to participate in Kylie's Top Ten Winners Hop! I am so honoured to be part of a group of tremendously talented designers from all around the world.  


Waves of Inspiration Thank You Card

I am in love with our Waves of Inspiration Collection! My newest card is above.


This card was inspired by one I saw that Linda Dalke, from Australia, made. I used our stunning new Waves of the Ocean suite. The Waves of Inspiration stamp & die bundle is an early release item in our upcoming new 2022-2023 Annual Catalogue. The Blue Foils Specialty Paper (as well as our gorgeous Waves of the Ocean Designer Series Paper [#159982] and Rhinestone Waves Basic Jewels [#159396]) are only available while quantities last--and I'm pretty sure they won't be around for long! If you live in Canada (and don't have a Stampin' Up! demonstrator) I'd love to be your demonstrator!! Find these products in my store by clicking on the links below!


This card actually came together pretty quickly! I stamped the wave image in Versamark, and then heat embossed using white Stampin' Emboss Powder. I added colour with our amazing Blending Brushes. I think that this stamp makes a pretty realistic looking wave! I mounted the card front on a Coastal Cabana cardstock layer, embossed the blue foil layer with the Splatters 3D embossing folder, and adhered that to a Coastal Cabana card base. The card front was added to the blue foil with Dimensionals.


The sentiment (a partially inked stamp from On The Horizon) is cut with one of the Waves dies, threaded with a "ribbon" of Supple Shimmer Specialty Paper, and added to the card front with Dimensionals. I was going to add three Rhinestone Waves Basic Jewels, but felt it had enough shine already with the embossing, the foil, and the shimmer ribbon.

Step by Step Instructions for Making the Waves of Inspiration Card:
  1. Cut the following layers:
    • Coastal Cabana cardstock: 11" x 4-1/4", scored at 5-1/2; 3-7/8" x 2-7/8"; 3" x 3/4" (for sentiment--die cut with Waves label die)
    • Shimmery White cardstock: 3-3/4" x 2-3/4"
    • Blue Foils Specialty Paper: 5-1/4" x 4" (emboss with Stripes &Splatter 3D Embossing Folder)
    • Supple Shimmer Specialty Paper (white iridescent): 4" x 1/4"
  2. Stamp the wave on Shimmery White cardstock with Versamark, heat emboss with white embossing powder.
  3. Add ink to sky (Balmy Blue) and wave (Pool Party, Bermuda Bay, Pacific Point, Misty Moonlight) with Blending Brushes.
  4. Adhere to Coastal Cabana layer. Attach to blue embossed foil using Dimensionals.
  5. Adhere to card base.
  6. Stamp sentiment in Pacific Point, cut ends of the Supple Shimmer banner at an angle, thread through holes of label, and use Dimensionals to attach to card front.

The Waves of the Ocean Suite Collection is absolutely stunning!! As I mentioned, some of the products are available only while quantities last, so order quickly if you want them! The product links are below.

Here is the card I submitted for this month's contest. Thanks again for voting it into third place! To see more photos and directions for the card below, click here.


I'd love for you to comment below, if you have a moment. 😊 Then be sure to check out the other amazing creations in Top Ten Winners Hop! You'll see some beautiful projects!!


Monday, March 21, 2022

Woohoo!!! SALE!! 20% Off Mini Stampin' Cut & Emboss Machine and Select Stamp & Die Bundles!!

Exciting news!! Until March 31st, our Mini Stampin' Cut & Emboss Machine is 20% off!! 

If you haven’t already, it’s time to meet your mini crafting companion: the Mini Stampin’ Cut & Emboss Machine! If this is your first encounter, allow me to introduce you...

This mini—but mighty—machine is durable, portable, and easy to use. It’s the perfect pick for budding beginners who want to branch out, papercrafting pros who want to craft on the go, or those who are short on storage space! With this trusty tool, any crafter can make precise cuts and embossed designs for their projects with one pass.

I have to admit, when this machine first came out, I didn't really think I needed it... 🤦🏻‍♀️ (It's certainly not the first time I've been wrong!!) I LOVE this machine, and wouldn't be without it now! It's perfect for smaller die cuts, to use on my desk, and I take it with me when I go away (even camping!)it folds up, and doesn't take up much room at all! 

Right now, you can snag the Mini Stampin’ Cut & Emboss Machine at a 20% discount! This miniature machine is compatible with a large selection of Stampin’ Up! embossing folders and dies. Build your craft collection and combine the Mini Stampin’ Cut & Emboss Machine with any (or all!) of the 13 select stamp-and-die bundles that are also available for 20% off during the month of March! 

See the photos below to see the prices of the sale bundles, and, if you live in Canada, click the product links to go to my store and order online. Don't delay! This sale ends on March 31st!!


20% Off Our Mini Stampin' Cut & Emboss Machine!!


Remember that this sale ends March 31st, 2022!! Don't miss it--order by clicking the product links below.

Thanks for visiting my blog!! If you live in Canada, I'd love to be your Stampin' Up! demonstrator, if you don't have one!

tams# 69919

Product List

Monday, March 14, 2022

Sorry to See You Go, In Colors!!

Welcome to the March edition of our blog hop! You may have noticed that we have a new logo, and a new name--Coast to Coast Creators!! This makes sense, because our team is made up of demonstrators from all across Canada--from Vancouver Island all the way to the Maritimes!! This month we are paying tribute to our collection of 2020-2022 "In Colors" (Misty Moonlight, Just Jade, Magenta Madness, Cinnamon Cider, and Bumble Bee), which will be retiring when our new Annual Catalogue comes out in May. Our ink pads, ink refills, cardstock, Stampin' Blends, and Stampin' Write Markers will sell out quickly, so if you need to restock, order quickly! 

If you live in Canada, click here to order in my online store here, and receive a gift from me!


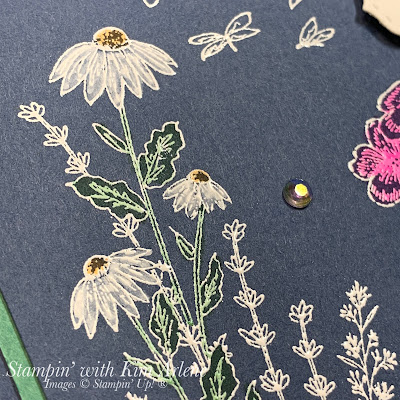
My three favourites of the five are Misty Moonlight, Just Jade, and Magenta Madness, and I've featured these in this card. I used our Dandelion Garden and Quiet Meadow cling stamp sets.


I stamped in Versamark, and then heat embossed with white embossing powder. My original intent was to leave it at that, but I decided to add some touches of colour with Stampin' Blends, as well as use a White Stampin' Chalk Marker for the petals of the daisy. This card came together quite quickly--see the directions below.

  1. Cut the following layers:
    • Misty Moonlight cardstock: 8-1/2" x 5-1/2", scored at 4-1/4""; 3-7/8" x 5-1/8"
    • Just Jade cardstock: 3-15/16" x 5-3/16"
    • Basic White cardstock: 1-3/4" x 1-1/2" (for sentiment)--cut with Stitched So Sweetly die
  2. Stamp the flowers and butterflies in Versamark on the smaller Misty Moonlight layer, and heat emboss with white embossing powder. 
  3. Colour the flowers, leaves, and daisy centres with Stampin' Blends (Magenta Madness, Just Jade, and Cinnamon Cider). Use a White Stampin' Chalk Marker to fill in the petals of the daisies.
  4. Wrap a 16" piece of ribbon around the card front and tie into a bow.
  5. Stamp sentiment in Just Jade on Basic White die cut label, and add to card front with Dimensionals.
  6. Add three Iridescent Rhinestone Basic Jewels.
Thanks for visiting my blog! If you have a moment, please leave a comment below. Then be sure to check out the rest of our very talented Coast to Coast Creators' blogs to see their beautiful creations!

❤️ Kim

You are invited to the Inlinkz link party!

Click here to enter
Product List


If you live in Canada 🇨🇦 and don't have a Stampin' Up! demonstrator, I'd love to be your demonstrator! 


Thank you so much for leaving a comment! I'd love to hear from you!

Delightful Wishes Card - Coast to Coast Creators December Blog Hop

Hello! Welcome to our December Coast to Coast Creators Blog Hop! This month we are using a Sketch Challenge to design our cards! I used our ...