
Hello, and Happy New Year!! Thank you so much for visiting my blog! It's time for Kylie Bertucci's January International Blog Highlights contest, and I have made a special card for it. If you like it, I hope that you will vote for me! Please click on the button below to go to Kylie's blog, and vote by clicking on the top right corner of the thumbnail of my card (#7), until you see the heart turn red. Thank you so much for your support!!
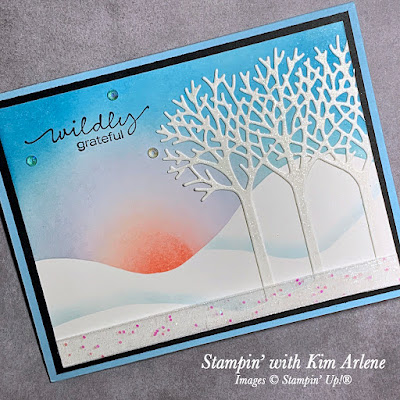

Now that Christmas is over, it's time for me to make a non-Christmas card. But we've had so much snow here, and it's been so cold, I decided a winter thank you card was in order. This card is a version inspired by two cards I made previously--it's a combination of a Penguin Place card and an Inspiring Canopy card. I hope you like it!

I used Shimmery White cardstock, Blending Brushes, Sponge Daubers, and cut Post-it Notes to create the sky. I just love how easily this all comes together when you use these brushes!! They're amazing! The trees are cut from Basic White cardstock, and then painted with Wink of Stella to give them some shimmer! Our new Iridescent Rhinestone Basic Jewels (158130)--available in our new January to June mini catalogue (which goes live January 4th--woohoo!!)--are the perfect embellishment to finish this card.
- Cut the following layers:
- Balmy Blue: 5-1/2" x 8-1/2", scored at 4-1/4"
- Basic Black: 5-1/4" x 4"
- Shimmery White Cardstock: 5-1/16" x 3-13/16"
- Basic White cardstock: 3-1/4" x 4"
- Cut some Post-it notes to form the hills and snowbanks, and place on the Shimmery White cardstock.
- Colour the sky using a Blending Brush, starting with Flirty Flamingo for the sun, and then adding Fresh Freesia, Highland Heather, Balmy Blue, and Pacific Point ink. Use Sponge Daubers and a small amount of Balmy Blue ink just above each snowbank.
- Stamp sentiment (from Lovely You) in Memento.
- Cut the trees from Basic White, paint generously with Wink of Stella, and adhere to card front.
- Cut a 6-1/2" piece of ribbon and adhere to back of Shimmery White card front with mini glue dots. Glue card front to Basic Black layer, and then to Balmy Blue card base.
- Add three Iridescent Rhinestones to finish card.

Thanks so much for stopping by--and for voting!!! If you like my card, please click here--then remember to click on the top right corner of the thumbnail of my card (#7) until the heart turns red--that way you know that your vote is registered:
If you live in Canada and do not have a Stampin' Up! demonstrator,
I would love to be your demonstrator! Shop here! 😊
Thank you very much for visiting my blog,
and for your support!! 😊
❤️ Kim
Abstract Beauty MEGA Stamp Camp--REGISTER NOW!!

Yay!! Our next stamp camp is coming soon! Our past events have received rave reviews! I hope you’ll join us! Here are the details:
Are you ready for our BIGGEST stamp camp ever with 16
AWESOME projects? Join me and 7 incredibly talented friends as we bring you our Abstract Beauty MEGA Stamp Camp! This will be a full weekend stamp camp, February 5-6, 2022, from 9:30 am to 3:00 pm PST on both days! It will be a fabulous weekend, crafting together from anywhere in Canada (if you live outside Canada, please see Option 3)!
What does the Abstract Beauty MEGA Stamp Camp include?
- 16 Make ‘n Take Kits for 16 awesome projects including all cardstock, envelopes, and any die cuts not included in the Hello Beautiful Bundle!
- Unlimited access to an EXCLUSIVE Facebook group just for stamp camp attendees!
- 16 Video Tutorials! These will be LIVE but recorded so you can watch later, as well!
- 16 Written Tutorials in a printable PDF!
- An Entry into our Prize Draws!
 |  |  | ||
 |  |  |  | |
 |  |  |
")


 Glittered Organdy Ribbon")


Beautiful card Kim! It looks so peaceful. Thanks for being part of my International Blog Highlights this month and all the best with voting!
ReplyDeleteThank you so much, Kylie! It's fun to participate, and it gets me designing!!
DeleteGorgeous card Kim! Beautiful blending, the addition of the glimmer ribbon is great! 🙂🇨🇦
ReplyDeleteThanks very much, Lesley! I love working with our Blending Brushes!
DeleteWhat a serene and peaceful card Kim :)
ReplyDeleteThanks for your kind comment, Kim!
DeleteLove your card because it is just my style! I can see me making a card similar to this. I'm sure you'll hit the Top Ten with this one!
ReplyDeleteAwww, thanks very much, Robbie! Fingers crossed that we'll both be there!!
DeleteSuch a gorgeous card, Kim!
ReplyDeleteLori, thank you so much for your sweet comment!
Delete