Monday, March 29, 2021

Hydrangea Hill Mercury Glass Thank You Card

Thank you for visiting my blog! I am really excited to be participating in Kylie Bertucci's Top Ten Winners Hop, and am honoured to once again be in a group with some very talented designers from all over the world. Thanks to your votes, my card came in #2!!  In case you haven't seen it, I have posted it at the bottom of this blog entry.

This was a quick and easy card to make! I started with an 8-1/2" x 5-1/2" Rococo Rose card base, scored at 4-1/4". I added a 4" x 5-1/4" layer of Rococo Rose which had been embossed with our Painted Texture 3D embossing folder, and adhered it with Seal. A piece of Rococo Rose Hydrangea Hill Mercury Glass Designer Acetate was cut with the largest Stitched So Sweetly scalloped rectangle die, and adhered it to the Rococo Rose layer with Seal+ (this doesn't show through the acetate). I cut a 1/2” slit in the fold of the card with my paper trimmer, inserted a 16" piece of Whisper White Polka Dot Tulle ribbon through the slit, and tied it into a bow at the right side.


The sentiment (from the Simply Succulents stamp set) was stamped in Rococo Rose, and then diecut with one of the Potted Succulents stitched label dies (I love the dies in this set!) and popped up with Dimensionals. Three Basic Rhinestone gems give the card a bit of bling.


The beautiful butterfly is die cut from our Butterfly Bijou Designer Series Paper. This, sadly, has sold out--but don't worry, you can stamp and die cut these with the bundle! It was attached with liquid glue (on the body only), so that the wings could lift up from the paper.

An easy-peasy card, right?

Here is my card that was voted #2 in Kylie Bertucci's International Highlights Blog Contest (this card uses the large background die from our Potted Succulents dies):


Thank you for taking the time to visit my blog. If you have a moment, please leave a comment below. Then be sure to hop to the next Top Ten Winner’s blog! You'll see some amazing creations!

❤️ Kim


Product List


Sunday, March 14, 2021

Brilliant Wings Card


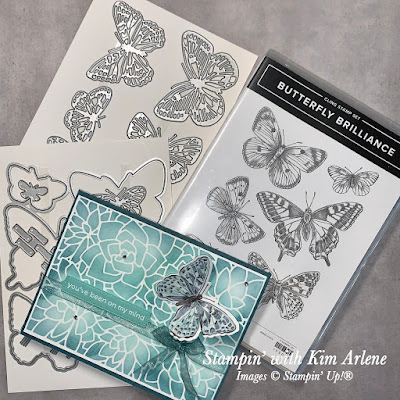
Hi there, friends! Welcome to the March edition of the West Coast Creators Blog Hop! This month we are focusing on butterflies! We have a beautiful new time-limited collection that is now available to customers, called Butterfly Brilliance. My package arrived just today, so I haven't had much time to play with it, but let me tell you--it's gorgeous!! I love it... and I'm not really much of a butterfly person!


I demonstrated how to make the background of this card at our last team meeting. I used Blending Brushes, and a stencil made from the Potted Succulents large die. I cut it from a 5-3/8" x 4" piece of Thick Basic White cardstock. I used a "two for one" method that I saw on Robin Daus' blog. Let me explain: I used Post-it Tape to hold the resulting stencil in place over a 5-3/8" x 4" Basic White piece of cardstock (over one of our grid sheets). I applied inks (Balmy Blue, Coastal Cabana, Bermuda Bay, and Pretty Peacock) with our Blending Brushes, starting with the lightest colour and getting darker each time toward the outer edge of each flower. You need to remember to lift the Post-it Tape when you get to the corners (one corner at a time), and get the ink right to the edge of the stencil. Once the corner is done, carefully put the tape back to hold the stencil in place.

After the colouring is finished, remove the tape from all corners. Both of the white cardstock pieces are beautifully coloured, and you can make two cards--one from the stencil itself, and one from the lower piece (which is what I used for the card below)! Pretty awesome technique, hey?? 


The rest of the card was very quick to complete. I used some of our Sheer Pool Party ribbon, but it was way too light to show on the card. I used the brush end of the light Pretty Peacock Stampin' Blends to colour a 20" piece of ribbon, and it matched beautifully! I tied it in a bow around the inked card front. This was adhered to a 5-1/2" x 8-1/2" (scored at 4-1/4") card base of Pretty Peacock cardstock. 


I heat embossed the sentiment (from the Simply Succulents stamp set) on Coastal Cabana, cut it with one of the label dies from Potted Succulents, and attached it to the card with Dimensionals.


The butterfly is from the Bijou Butterfly Designer Series Paper (DSP). Now here is a stroke of brilliance (pun intended!)--the Brilliant Wings die will cut six butterflies from the DSP all at once!! Easy Peasy!!! I ran a line of glue on the back of the butterfly body only, adhered it to the card, and folded the wings up a bit. Three Basic Rhinestone Jewels were added to the card.


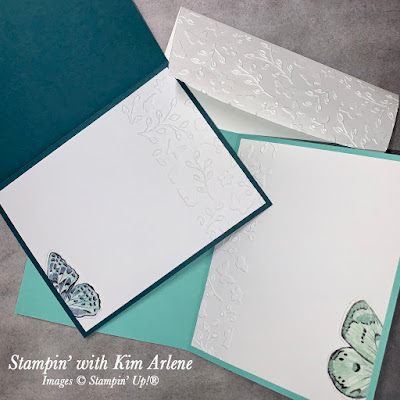
I embossed a piece of Basic White for the inside of the card with one of the Meadow Moments embossing folders. I also embossed the flap of the envelope.

After the six butterflies are cut from the sheet of 6" x 6" DSP, there are a few part butterflies left. You can use the die to cut those out, as well, and they are great for adding to the inside of the card.


 So what about the stencil itself? Why, I'm so glad that you asked... 😉 I embossed a 4" x 5-3/8" Basic White piece with the Subtle 3D embossing folder, and glued the stencil to it (with a fine line of glue around the edge of the diecut). 


A 12" length of the Pretty Peacock/Old Olive Reversible Ribbon was tied into a knot around the card (the Pretty Peacock side is showing), and then the card front was glued to an 8-1/2" x 5-1/2" (scored at 4-1/4") Coastal Cabana card base. 

The sentiment was heat embossed and diecut from another Potted Succulents die, and added to the card with Dimensionals. A butterfly cut from the DSP was glued to the card front, and I added three rhinestones.

Thank you very much for visiting my blog! Please leave a comment below, if you have time. Then be sure to visit the other blogs--there are some gorgeous cards to see!!

❤️ Kim

You are invited to the Inlinkz link party!

Click here to enter
Product List
Bermuda Bay Classic Stampin' Pad
[131171]

Monday, March 8, 2021

Sand & Sea Thank You Card

Hello, and thank you for visiting my blog! It is time for Kylie Bertucci's March Monthly International Blog Highlights contest, and I would like to ask for your vote, please! If you like my card, please click on the button below to go to Kylie's blog, and vote for me by clicking on the top right corner of the thumbnail of my card (#7), until you see the heart turn red

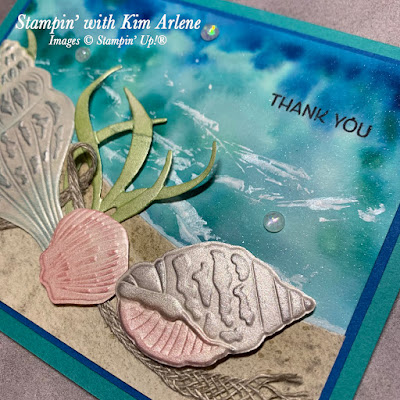
This month I am featuring one of my favourite suites--the Sand & Sea Suite. To make this card, I used Sand & Sea Designer Series Paper--DSP (for the sand), the Friends are Like Seashells Bundle (stamps and dies), our gorgeous Pearlescent Specialty Paper, the Seashells 3D Embossing Folder, and Opal Rounds embellishments. This is similar to a card I did for my last blog entry, but I wanted to do a watercolour wash background this time (which I haven't done for a while), so I started with a 5" x 3-3/4" piece of Shimmery White cardstock. I sprayed water on both sides, getting the front quite wet, and then picked up drops of ink refills (Balmy Blue, Bermuda Bay, and Pacific Point) with a Water Painter and touched it to the water and let it blend. 


After it dried, I put a few drops of Frost White Shimmer Paint onto an acrylic block, scrunched up some Saran Wrap, dipped it into the paint, and pressed it gently onto the watercoloured background, to represent waves in the water. 


I cut a 5" x 2" piece of the sand DSP, diecut it with one of our Curvy Dies (you could also use scissors), and attached it to the dry watercolour background with Seal. This was layered on a 5-1/8" x 3-7/8" Pacific Point cardstock, and then adhered to a 5-1/2" x 8-1/2" Bermuda Bay card base, scored at 4-1/4". 

I cut a 5-1/4" x 4" piece of Pearlescent Paper with the large Seaside Seashells Die, and then embossed it with with our Seashells 3D Embossing Folder. I cut three or four of the shells to separate them, keeping some seaweed attached to the largest shell. I used the remaining shells on another card. 


The shells were coloured using a Sponge Dauber and Classic Ink Pads--Seaside Spray, Blushing Bride, and Smoky Slate/Blushing Bride. I masked the shell with paper if I didn't want ink on parts of it (or the seaweed). I also sponged some Mint Macaron ink onto pieces of seaweed. This is a really quick and easy way to colour the shells, and the Pearlescent Paper makes them look so pretty! 


Next, I cut a 7" piece of our 3/16" Braided Linen Trim, and pulled it apart a bit to give it a rustic look. I used glue dots to attach it to the card base, and put a loop in one part (using a glue dot at the twisted part). I really liked the look of the frayed edges! I adhered the seaweed with glue dots and the two largest shells with Seal to the "sand", adhered the last shell with Dimensionals, and for a bit of bling, added three Opal Rounds. What do you think?


For the two cards below, rather than using the Saran Wrap waves, I just painted with Shimmer Paint with a Water Painter (but I wasn't really fussy about how it turned out--I'm not artistic enough for this, apparently). I also added four shells, instead of three.


If you like my card, please vote for me by clicking on the following link--then click the top right corner of the thumbnail of my card (#7) until the heart turns red:

Please click here to vote for my card.

Thank you very much for visiting my blog, and for your support!! 😊

❤️ Kim

Product List

Card Keeper Kit Double-Up Online Class!

Lori Willcox and I are very excited to bring you our   CARD KEEPER KIT DOUBLE-UP CLASS!  For a fee of   $59 , you will make a total of   20 ...