Sunday, August 30, 2020

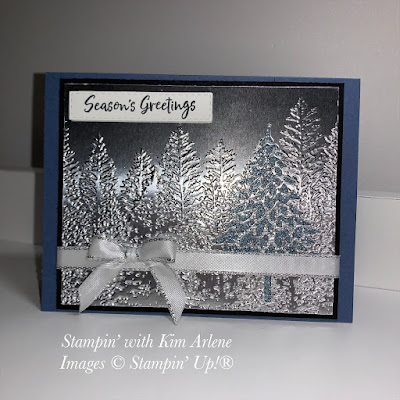
Evergreen Forest Embossed Card


I can't believe the STUNNING results when I use the Evergreen Forest 3D embossing folder on silver foil!!! Adding a die cut tree with one of the Pine Woods Dies makes a gorgeous (but quick to make) Christmas card! 


I made this card for a team swap where we showcased our new holiday Mini Catalogue. I started by die cutting a piece of silver foil with one of the trees from the Pine Woods Dies. Then I embossed the die cut piece with the Evergreen Forest embossing folder. I added a piece of Balmy Blue Glimmer Paper under the cutout. Wow! I loved the effect! The photo doesn't really do it justice!

The foil piece was adhered to a piece of Basic Black cardstock, wrapped and tied with some silver Metallic-Edge Ribbon, and then attached to a Misty Moonlight card base. A greeting from our In the Pines stamp set was stamped on Whisper White and cut from the smallest Stitched Rectangles die. My easy-peasy Christmas card is completed!!


If you would like to order any of these products, use my Host Code (see the right sidebar) for this month to get a free gift from me--click on the "Shop Now" tab at the top of my blog. 

Product List

Monday, August 24, 2020

Kylie's Winners Hop - Feels Like Frost/In the Pines Card


I would like to thank everyone who voted for my card--you helped me finish in first place in Kylie Bertucci's International Blog Highlights contest!! Woohoo! I am so honoured to be part of a group of such talented winners!! Be sure to check out their amazing work by clicking on the links below.

Our theme for the blog is “thank you”. For my card, I used our Feels Like Frost Specialty Designer Series Paper—I was really happy to see that it is a returning favourite in our new Mini Catalogue! These papers are absolutely gorgeous!  One side features a beautiful photo in an array of lovely colours, and the reverse side has pretty silver foil patterns.


To make this card, I used a strip of the Feels Like Frost paper, and attached it to a layer of Highland Heather cardstock. An outline of the largest tree from In the Pines was stamped with Versamark ink, then heat embossed with white embossing powder. Next, I painted the tree with Frost White Shimmer paint, and once it was dry, I adhered it to the Highland Heather layer, using liquid multipurpose glue applied to the back of the vellum with a sponge.

A bow maker was used to tie a bow with the silver Metallic-Edge Ribbon, which was then attached around to the back of the Highland Heather cardstock with glue dots. The card front was layered on a Purple Posy cardstock layer, and then to a Blackberry Bliss card base. The sentiment is from our Very Versailles stamp set, which is cut using the smallest Stitched So Sweetly die. Three Rhinestone Basic Jewels finish off the card.

Friday, August 14, 2020

West Coast Creators Blog Hop--August 2020


This month our West Coast Creators Blog Hop will focus on the new Holiday Mini Catalogue! 

I wanted to make a Christmas card, and was inspired by our beautiful Snowflake Splendor Designer Series Paper, and its amazing shades of blue. I positioned three of the So Many Snowflakes dies onto the paper, and die cut them, saving the six small bits from the centre of each snowflake. 


I layered a piece of the Balmy Blue Glimmer Paper under the cutouts, adhering with Multipurpose Liquid Glue, adding the cutouts at the same time. The card front was glued to a piece of Night of Navy cardstock. I added a piece of our Snowflake Splendor 1/4" Ribbon over the DSP and around to the back of the navy piece, adhering with glue dots, then added a bow to the front. These layers were attached to a Pacific Point card base. The sentiment, from Snowflake Wishes, was stamped on white with Pacific Point, and then cut out with one of our Stitched So Sweetly Dies.


I love how the sparkly glimmer paper shows through these snowflake cutouts! The sentiment, "May Your Season Sparkle" seemed fitting! There's a lot of sparkle on this card--the glimmer paper, the gorgeous Snowflake Splendor Ribbon, and the Rhinestone Basic Jewels on the tag.

Thanks for stopping by!  Please leave a comment below, if you like. Be sure to check out all the other cards made by our talented ladies, by clicking on the links below.


You are invited to the Inlinkz link party!

Click here to enter

Monday, August 10, 2020

Thank You Snow Much!


I am thrilled to participate in Kylie's Demonstrator August Blog Hop, along with many talented Stampin' Up demonstrators from around the world!

I host a monthly Virtual Technique Club, and my sister gives us challenges to complete before our next virtual get-together. A recent challenge was to design a Christmas card in non-traditional colours. This was a great challenge for me, because I LOVE making Christmas cards in blues. We also had a team challenge to use the colours Misty Moonlight, Rococo Rose, and Soft Sea Foam. This card was designed to cover both challenges. 


The card base is Misty Moonlight--I stamped in Misty Moonlight around the perimeter of it with snowflakes from our brand-new Snowflake Wishes stamp set. The card front is also Misty Moonlight. I smooshed (I'm pretty sure that's a card-making term... right??) my White Craft Ink pad over the raised part of my Winter Snow Embossing Folder (also in our new Holiday Mini Catalogue), and ran it through my embossing machine. This was layered on a Soft Sea Foam cardstock layer, and then adhered to a small piece of Rococo Rose cardstock. The ribbon is our 3/8" Metallic-Edge Ribbon (silver), which I coloured using a Rococo Rose Stampin' Blends marker.


The sentiment is also from Snowflake Wishes, which is cut out with one of the Tasteful Labels dies--I have been using this die set a LOT lately!! Three Rhinestone Basic Jewels add a little more sparkle to my card!

Thanks for stopping by!!  Please be sure to check out the other cards in the August Demonstrator Training Program Blog Hop--you'll be glad that you did!!

 
Product List


Monday, August 3, 2020

Mountain Air Scenic Card


I am super-excited to be participating for the first time in Kylie Bertucci's International Blog Highlights!!!

PLEASE VOTE FOR ME HERE!

This card features a wonderful watercolour background technique that I learned from Sherrill Graff, a fellow demonstrator.  This is a quick and easy technique that creates a one-of-a-kind background that can be as subtle or as bold as you like.  The rest of the card is just simple stamping, with a touch of heat embossing on the mountain tops.

I used the gorgeous Mountain Air stamp set--one of my favourites!--on this card.  The watercolour background is done on Shimmery White cardstock, then matted on Basic Black cardstock, and adhered to a Bermuda Bay card base.  The sentiment comes from Good Morning Magnolia.  A double strand of linen thread finishes it off!

Here's a close-up of the mountains and the lake.  This card was so much fun to do!!  Please vote for my card by clicking on the link below!


Thank you very much for visiting my blog!  If you live in Canada, and want to order any of the products used for this card (see below), please visit my online store, and use the Host Code above. 


Please click here to vote for my card! 


After you vote 😊, if you would like to get a FREE TUTORIAL so you can make my card, please click on this link:

Click here for a FREE TUTORIAL  for this card.


Product List
Old Olive Stampin' Write Marker
[100079]

Delightful Wishes Card - Coast to Coast Creators December Blog Hop

Hello! Welcome to our December Coast to Coast Creators Blog Hop! This month we are using a Sketch Challenge to design our cards! I used our ...