Sunday, February 14, 2021

Sand & Sea Birthday Card


Welcome to the February edition of the West Coast Creators Blog Hop! This month we are focusing on Hey Chick, Hey Birthday Chick, and birthday cards in general. I wanted to use one of my favourite new products--the Sand & Sea Suite. I ended up using six of the seven components of it. There's so much to love!!


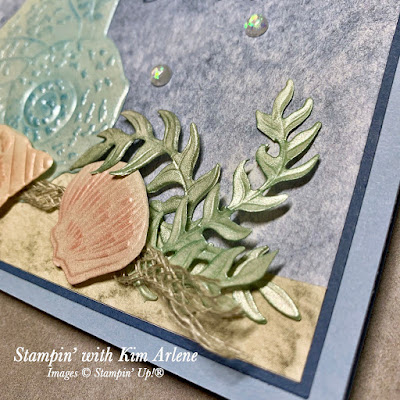
I started with two pieces of Sand & Sea Designer Series Paper (DSP)--a 5" x 3-3/4" piece of the Misty Moonlight DSP, and a 5" x 2-1/4" piece of Sahara Sand DSP (which I cut with a Curvy Die, but you could just use paper snips). I adhered the Sahara Sand piece to the Misty Moonlight DSP with Seal, and then that layer to a 5-1/8" x 3-7/8" Misty Moonlight mat. The card base is a 5-1/2" x 8-1/2" piece of Seaside Spray cardstock, scored at 4-1/4". I used my Stampin' Cut & Emboss Machine to die cut and emboss a 5-1/4" x 4" piece of Pearlescent Specialty Paper with the large Seaside Shells Die and Seashells 3D Embossing Folder. 


I cut apart the shells, leaving some seaweed attached to the largest shell, and I used our amazing Blending Brushes to add ink (Seaside Spray, Blushing Bride, Flirty Flamingo) to three shells, and Mint Macaron to some of the seaweed. I pulled the edges of a 7" length of 3/16" Braided Linen Trim apart, made a loop at one edge, and attached it to the DSP layer with glue dots. I added the shells and seaweed with Seal and Dimensionals.


Two of the seaweed "fronds" were curled up to give them some dimension, and glued so that they lifted a bit from the paper. 


The sentiment--from the Friends are Like Seashells stamp set--was stamped directly onto the DSP in Misty Moonlight. I added three Opal Rounds to complete the card. 


The Sand & Sea Suite is absolutely beautiful, and has so many possibilities for creativity!

Thank you very much for visiting my blog! Please leave a comment below, if you have time. Then be sure to visit the other blogs--there are some gorgeous cards to see!!

❤️ Kim

You are invited to the Inlinkz link party!

Click here to enter
Product List

Monday, February 1, 2021

Hydrangea Hill - Potted Succulents Thank You Card

It is time again for Kylie Bertucci's Monthly International Blog Highlights contest! I would like to ask for your vote again, please! If you like my card, please click on the link below, and vote for me by clicking on the top right corner of the thumbnail of my card (which is card #39), until you see the heart turn red 


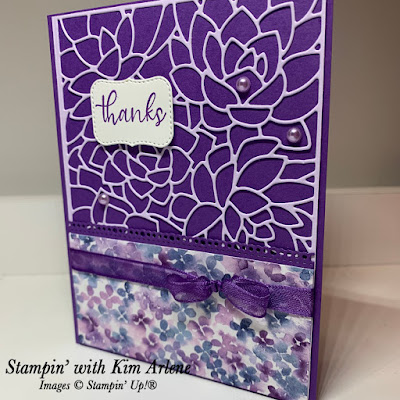
Our January to June Mini Catalogue is filled with AMAZING new products! I have several favourites, and this card showcases two of them--our gorgeous Potted Succulents Dies and beautiful Hydrangea Hill Designer Series Paper (DSP). This is a variation of a card I recently made for a team swap. 


The large die creates a STUNNING background for any card! I added a piece of adhesive sheet to the back of a 4" x  5-3/8" piece of Purple Posy cardstock. Then I cut it with the large die, and mounted it on a 4" x 5-3/8" piece of Gorgeous Grape cardstock. I cut a 4" x 2" piece of the Hydrangea DSP, and glued it to a Gorgeous Grape border (4" long) cut with one of the Ornate Borders dies, which just peeks out from the top of the piece. 


A 7" length of Gorgeous Grape Sheer Ribbon was tied using a bow maker, wrapped around the card, and then the ends were attached to the back of the cardstock with glue dots. The card front was adhered to an 8-1/2" x 5-1/2" (scored at 4-1/4") Gorgeous Grape card base. 


The sentiment (from Simply Succulents) was stamped in Gorgeous Grape on Basic White Cardstock, then cut with one of the lovely stitched dies from Potted Succulents Dies. I finished the card by adding three Highland Heather Pastel Pearls.

How many of the products from the January to June Mini Catalogue are on your wish list? Sale-a-Bration--one of Stampin' Up!'s best promotions of the year--is on now! For every $60 purchase, you can choose a FREE DSP or stamp set. Hurry though, because it's over at the end of February!! You won't want to miss this fantastic deal!

If you like my card, please vote for me by clicking on the following link--then click the top right corner of the thumbnail of my card (#39) until the heart turns red:

Please click here to vote for my card.

Thank you very much for visiting my blog, and for your support!!


Product List

Card Keeper Kit Double-Up Online Class!

Lori Willcox and I are very excited to bring you our   CARD KEEPER KIT DOUBLE-UP CLASS!  For a fee of   $59 , you will make a total of   20 ...